
Your new domain: newdomain.com
Your ACME DNS self-host domain: myacmedns.com
Example domain names.
Client
So you‘ve got a domain newdomain.com and you want to have certificates with wildcard such as *.newdomain.com.
Let’s build our own client:
# directory structure
/docker/acmedns-client/
  build/
    Dockerfile
  docker-build.sh
  docker-run.sh
  acmedns-client.sh
  certbot.sh
FROM alpine:latest as BUILDER
RUN apk add --no-cache go git
WORKDIR /data
RUN git clone --depth 1 https://github.com/acme-dns/acme-dns-client && \
cd acme-dns-client && \
go get && \
go build
FROM alpine:latest
RUN apk add --no-cache certbot
# Copy the built binary from the BUILDER stage
COPY --from=BUILDER /data/acme-dns-client/acme-dns-client /usr/local/bin/acme-dns-client
CMD ["/usr/local/bin/acme-dns-client"]build/Dockerfile#!/bin/bash
docker build -t harianto/acmedns-client -f build/Dockerfile buildharianto/acmedns-client#!/bin/bash
mkdir -p data/letsencrypt
docker run --rm -v ${pwd}/data/letsencrypt:/etc/letsencrypt -it harianto/acmedns-client sh#!/bin/bash
mkdir -p data/letsencrypt
docker run --rm \
-v ${pwd}/data/letsencrypt:/etc/letsencrypt \
-it harianto/acmedns-client certbot \
certonly \
--manual \
--preferred-challenges dns \
--server https://acme-staging-v02.api.letsencrypt.org/directory \
--agree-tos \
-m letsencrypt@newdomain.com \
--no-eff-email \
--manual-auth-hook '/usr/local/bin/acme-dns-client' \
"$@"#!/bin/bash
docker run --rm \
-v ${pwd}/data/letsencrypt:/etc/letsencrypt \
-it harianto/acmedns-client acme-dns-client "$@"
Don’t for get tochmod +xyour*.shfiles
Following scripts to run
- Build once:
./docker-build.sh. Your docker image would beharianto/acmedns-client
From this point you can run Docker Image harianto/acmedns-client however you want.- Register once:
./acmedns-client.sh register -s https://auth.acme-dns.io --dangerous -d newdomain.com
We’ll be usinghttps://auth.acme-dns.iofor test, before we create our server, for example:https://auth.myacmedns.com
You can ignore CAA record, for now.
It will prompt like this:
[*] New acme-dns account for domain newdomain.com successfully registered!
Do you want acme-dns-client to monitor the CNAME record change? [Y/n]: n
Domain: 7f1449b3-9371-4b6a-a472-6ab79764dae7.auth.acme-dns.io
To finalize the setup, you need to create a CNAME record pointing from _acme-challenge.newdomain.com
to the newly created acme-dns domain 7f1449b3-9371-4b6a-a472-6ab79764dae7.auth.acme-dns.io
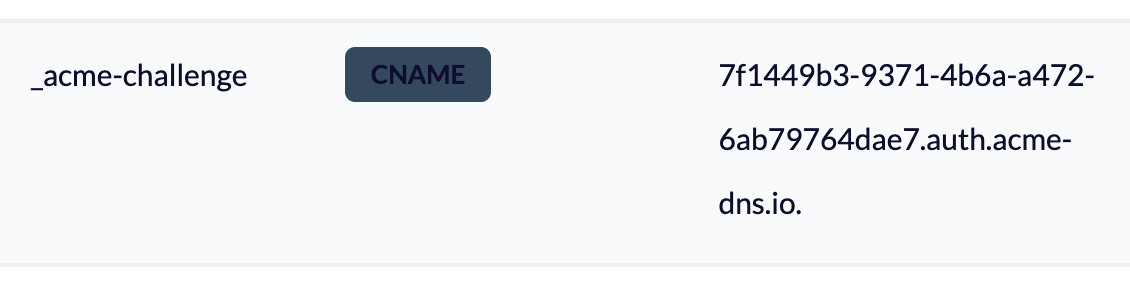
A correctly set up CNAME record should look like the following:
_acme-challenge.newdomain.com. IN CNAME 7f1449b3-9371-4b6a-a472-6ab79764dae7.auth.acme-dns.io.You have to go to your DNS Settings in the Control Panel for your newdomain.com. And add a record:
_acme-challenge.newdomain.com. IN CNAME 7f1449b3-9371-4b6a-a472-6ab79764dae7.auth.acme-dns.io.That might look like this.
- Then run certbot (every 3 months) and see magic happens:
./certbot.sh -d newdomain.com -d *.newdomain.com./data/letsencrypt/live/newdomain.comYour certificates will be saved in ./data/letsencrypt/live/newdomain.com directory.From this point, your should not having errors. Then you can create your own self-host ACME DNS. And have to register again with new (but once) and change your CNAME record (once again).
Server
So You want to self-host your ACME-DNS on myacmedns.com.
# directory structure
/docker/acmedns
Build
We can use the Docker Image joohoi/acme-dns or we build from his git repository.
There were few bumps installing, but one of the solution is to change Dockerfile and add new environment variable before go build.Let’s create a directory: /docker/acmedns
# create directory
mkdir -p /docker/acmedns
# goto
cd /docker/acmedns
# git clone: depth 1
git clone --depth 1 https://github.com/acme-dns/acme-dns.git build
# create empty file and chmod +x
touch docker-build.sh; chmod +x docker-build.shAt this pointbuildfolder is created, and then we createdocker-build.shfile.
#!/bin/bash
docker build -t harianto/acmedns-server -f build/Dockerfile buildrunning ./docker-build.sh now, you find some errors.Edit: /docker/acmedns/build/Dockerfile
Edit a line and inlude this CGO_CFLAGS="-D_LARGEFILE64_SOURCE"
# code here ...
RUN CGO_ENABLED=1 CGO_CFLAGS="-D_LARGEFILE64_SOURCE" go build

# code here ...
Dockerfile should look similar like this:
FROM golang:alpine AS builder
LABEL maintainer="joona@kuori.org"

RUN apk add --update gcc musl-dev git

ENV GOPATH /tmp/buildcache
RUN git clone https://github.com/joohoi/acme-dns /tmp/acme-dns
WORKDIR /tmp/acme-dns
RUN CGO_ENABLED=1 CGO_CFLAGS="-D_LARGEFILE64_SOURCE" go build

FROM alpine:latest

WORKDIR /root/
COPY --from=builder /tmp/acme-dns .
RUN mkdir -p /etc/acme-dns
RUN mkdir -p /var/lib/acme-dns
RUN rm -rf ./config.cfg
RUN apk --no-cache add ca-certificates && update-ca-certificates

VOLUME ["/etc/acme-dns", "/var/lib/acme-dns"]
ENTRYPOINT ["./acme-dns"]
EXPOSE 53 80 443
EXPOSE 53/udpRUN CGO_ENABLED=1 CGO_CFLAGS="-D_LARGEFILE64_SOURCE" go buildNow we can build.
# goto dir
cd /docker/acmedns
# build it
./docker-build.shharianto/acmedns-server is createdCreate docker-compose.yml
# create volume: docker volume create --name=letsencrypt
#volumes:
#  letsencrypt:
#    external: true

services:
  acmedns:
    image: harianto/acmedns-server
    container_name: acmedns
    #network_mode: host
    ports:
      - "53:53"
      - "53:53/udp"
      - "80:80"
      - "443:443"
    volumes:
      - ./data/acmedns_config:/etc/acme-dns:ro
      - ./data/acmedns_acmd-dns:/var/lib/acme-dns
      #- letsencrypt:/etc/letsencrypt:ro
restart: unless-stopped # Optional: to ensure the container restarts on failureParts that are commented # would be handy for advanced things, uncomment them any time.Running with:docker-compose upyou might see an error that noconfig.cfgis available.
You can copy config.cfg from the build folder and paste it to ./data/acmedns_config
[general]
# DNS interface. Note that systemd-resolved may reserve port 53 on 127.0.0.53
# In this case acme-dns will error out and you will need to define the listening interface
# for example: listen = "127.0.0.1:53"
listen = "0.0.0.0:53"
# protocol, "both", "both4", "both6", "udp", "udp4", "udp6" or "tcp", "tcp4", "tcp6"
protocol = "both"
# domain name to serve the requests off of
domain = "auth.myacmedns.com"
# zone name server
nsname = "auth.myacmedns.com"
# admin email address, where @ is substituted with .
nsadmin = "admin.myacmedns.com"
# predefined records served in addition to the TXT
records = [
    # domain pointing to the public IP of your acme-dns server
    "auth.myacmedns.com. A 31.14.98.159",
    # specify that auth.myacmedns.com will resolve any *.auth.myacmedns.com records
    "auth.myacmedns.com. NS auth.myacmedns.com.",
]
# debug messages from CORS etc
debug = false

[database]
# Database engine to use, sqlite3 or postgres
engine = "sqlite3"
# Connection string, filename for sqlite3 and postgres://$username:$password@$host/$db_name for postgres
# Please note that the default Docker image uses path /var/lib/acme-dns/acme-dns.db for sqlite3
connection = "/var/lib/acme-dns/acme-dns.db"
# connection = "postgres://user:password@localhost/acmedns_db"

[api]
# listen ip eg. 127.0.0.1
ip = "0.0.0.0"
# disable registration endpoint
disable_registration = false
# listen port, eg. 443 for default HTTPS
port = "443"
# possible values: "letsencrypt", "letsencryptstaging", "cert", "none"
tls = "cert"
# only used if tls = "cert"
tls_cert_privkey = "/etc/letsencrypt/live/myacmedns.com/privkey.pem"
tls_cert_fullchain = "/etc/letsencrypt/live/myacmedns.com/fullchain.pem"
# only used if tls = "letsencrypt"
acme_cache_dir = "api-certs"
# optional e-mail address to which Let's Encrypt will send expiration notices for the API's cert
notification_email = ""
# CORS AllowOrigins, wildcards can be used
corsorigins = [
    "*"
]
# use HTTP header to get the client ip
use_header = false
# header name to pull the ip address / list of ip addresses from
header_name = "X-Forwarded-For"

[logconfig]
# logging level: "error", "warning", "info" or "debug"
loglevel = "debug"
# possible values: stdout, TODO file & integrations
logtype = "stdout"
# file path for logfile TODO
# logfile = "./acme-dns.log"
# format, either "json" or "text"
logformat = "text"
Change toport="80", andtls="none" if your server don’t have certificates yet. And register server running this:./acmedns-client.sh register -s http://auth.myacmedns.com.
Change DNS Settings
For my newly discovery that works. Your DNS Settings need to able to add NS records. I’ve tried with A records, but it doesn’t work.
There can only be one record with auth.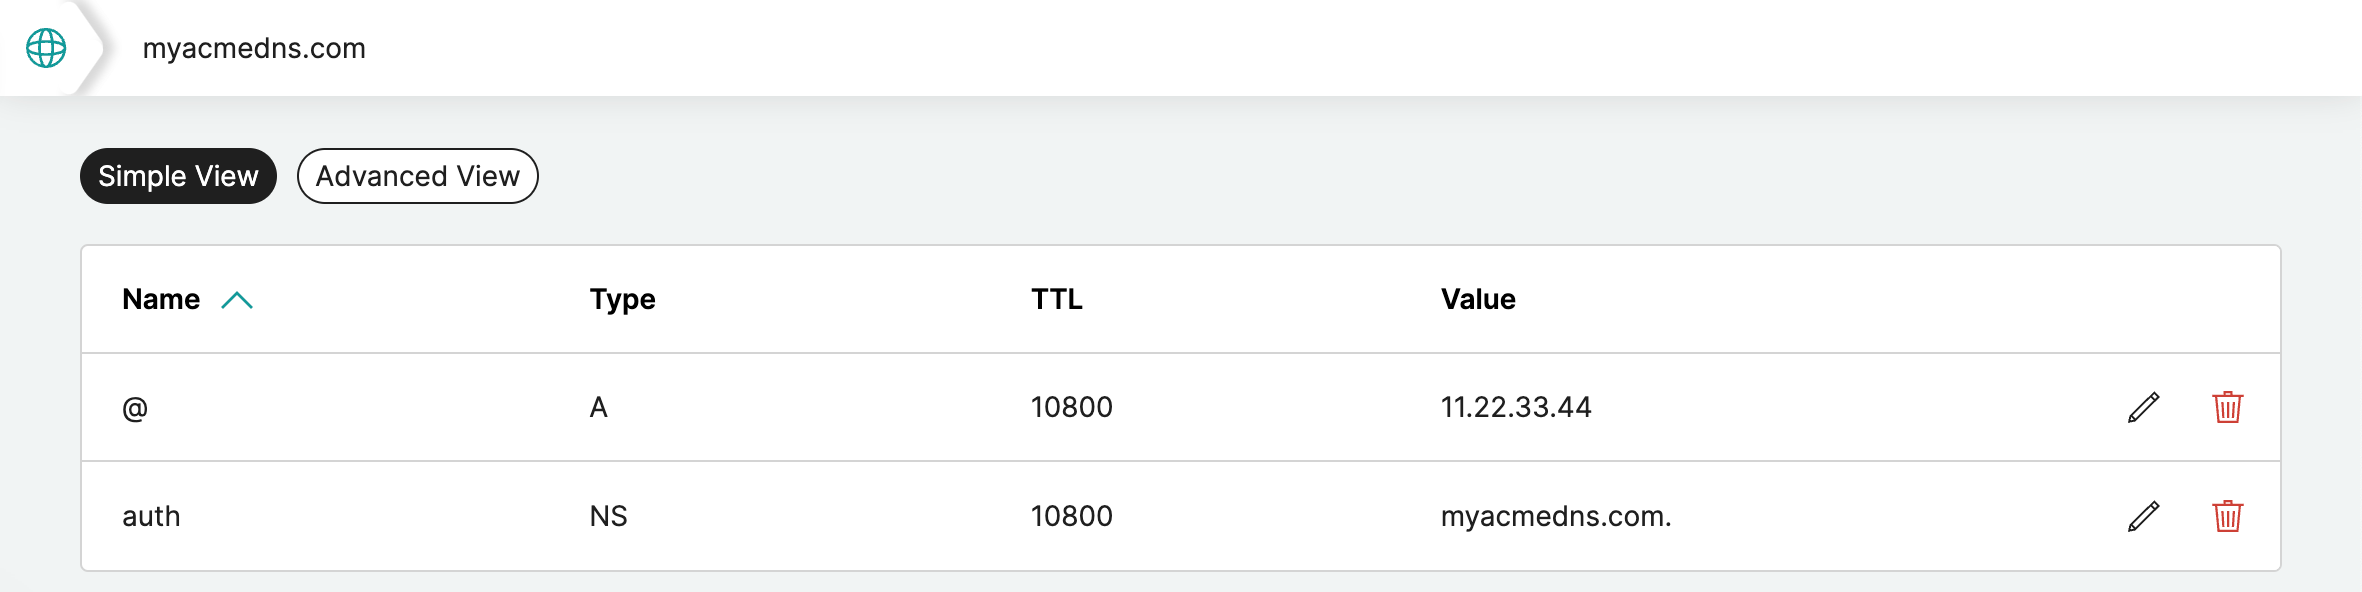
@points to your public addressA11.22.33.44,auth.myacmedns.com points toNSmyacmedns.com.
Let’s go back to our Client
Going back to your newdomain.com terminal, we need to run some commands again, to register and creating certificates.
Register once
With your self-host server, you can update new server path.
# goto
cd /docker/acmedns-client
# register once
./acmedns-client.sh register -s https://auth.myacmedns.com
Follow instructions and remember CNAME record, for example:
_acme-challenge.newdomain.com. IN CNAME 7f1449b3-9371-4b6a-a472-6ab79764dae7.auth.myacmedns.com.Update DNS Settings once
Go to your control panel and update your DNS records.
Get your certificates and see the magic happens
# goto
cd /docker/acmedns-client
# get certificates
./certbot.sh -d newdomain.com -d *.newdomain.com
Does it work for you?
Let me know if this works for you, or give me a thumbs up!