
Synology: DSM 7.2.1-69057 Update 3
For those who had errors after reboot. The script that update the DSM devices works for me.
When Synology released DS920+, many customer (include me) think the additional NVME slots can use as storage. But the truth is - NVME SSD can only setup as cache in DSM.
As DSM is a Linux based system, I think I can try to use command (instead of DSM interface) setup NVME as storage. After some trial and test, I found the step to make it work.
You should have some knowledge on using command line (ssh) in DSM and highly recommend to backup you system beforehand. Also, you may risk to lost your DSM setting/volume/data.
Install NVMe SSD
Install NVME SSD to DS920 and bootup.
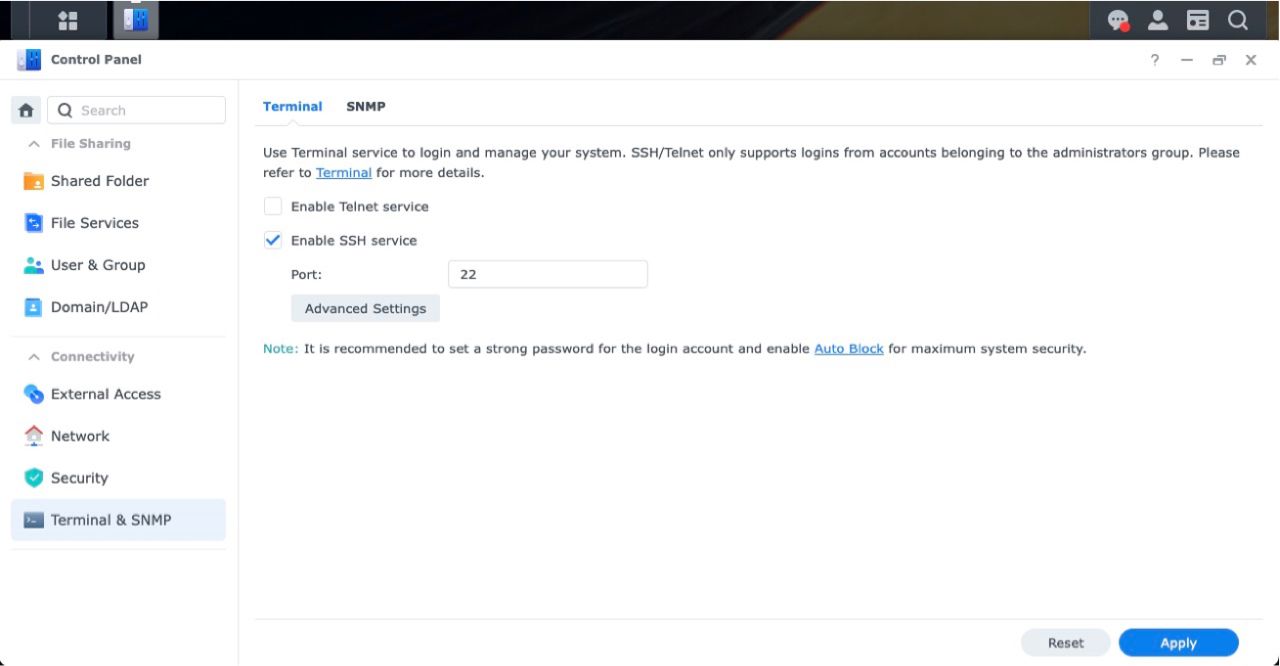
Enable SSH
If you already enabled SSH. You can skip this.
Enable SSH login on your DS920+.
Use script to add your drives to your Synology's drive compatibility database v1.2.16
I found some sources to fix my device by running a script. Read more below how I fixed my NVMe device.
Login to SSH as root ( sudo -s )
# create directory
mkdir -p /volume1/scripts
# goto directory
cd /volume1/scripts
# download file from github and untar
curl -sSL https://github.com/007revad/Synology_HDD_db/archive/master.tar.gz | tar -xvzf -Synology_HDD_db-main/Synology_HDD_db-main/
Synology_HDD_db-main/.github/
Synology_HDD_db-main/.github/FUNDING.yml
Synology_HDD_db-main/CHANGES.txt
Synology_HDD_db-main/LICENSE
Synology_HDD_db-main/README.md
Synology_HDD_db-main/bin/
Synology_HDD_db-main/bin/dtc
Synology_HDD_db-main/how_to_schedule.md
Synology_HDD_db-main/images/
Synology_HDD_db-main/images/how_to_download.png
Synology_HDD_db-main/images/ram_warning.png
Synology_HDD_db-main/images/schedule1.png
Synology_HDD_db-main/images/schedule2.png
Synology_HDD_db-main/images/schedule3.png
Synology_HDD_db-main/images/syno_hdd_db.png
Synology_HDD_db-main/images/syno_hdd_db1.png
Synology_HDD_db-main/images/syno_hdd_db2.png
Synology_HDD_db-main/images/syno_hdd_db_help.png
Synology_HDD_db-main/images/syno_hdd_db_help2.png
Synology_HDD_db-main/images/unknown.png
Synology_HDD_db-main/images/update-now-disabled.png
Synology_HDD_db-main/images/update-now-working.png
Synology_HDD_db-main/images/vendor_ids.png
Synology_HDD_db-main/my-other-scripts.md
Synology_HDD_db-main/syno_hdd_db.sh
Synology_HDD_db-main/syno_hdd_vendor_ids.txtchmod +x Synology_HDD_db-main/syno_hdd_db.shRun the script
# CHMOD the file
chmod +x Synology_HDD_db-main/syno_hdd_db.sh

# Run the script
/volume1/scripts/Synology_HDD_db-main/syno_hdd_db.sh
Synology_HDD_db v3.4.84
DS920+ DSM 7.2.1-69057-3
StorageManager 1.0.0-0017
Using options:
Running from: /volume1/scripts/Synology_HDD_db-main/syno_hdd_db.sh
HDD/SSD models found: 1
ST16000NE000-2RW103,EN02
M.2 drive models found: 1
Samsung SSD 980 PRO 1TB,4B2QGXA7
No M.2 PCIe cards found
No Expansion Units found
ST16000NE000-2RW103 already exists in ds920+_host_v7.db
Edited unverified drives in ds920+_host_v7.db
Added Samsung SSD 980 PRO 1TB to ds920+_host_v7.db
Backed up synoinfo.conf
Support disk compatibility already enabled.
Support memory compatibility already enabled.
NVMe support already enabled.
Enabled M.2 volume support.
Drive db auto updates already enabled.
DSM successfully checked disk compatibility.
You may need to reboot the Synology to see the changes./volume1/scripts/Synology_HDD_db-main/syno_hdd_db.shv3.4.84 this time of writing
https://github.com/007revad/Synology_HDD_db/archive/refs/tags/v3.4.84.tar.gz
Optional
You can download the file from the Release instead of Main branch
 007revad
curl -sSL `curl -sSL https://api.github.com/repos/007revad/Synology_HDD_db/releases/latest | jq -r '.tarball_url'` | tar -xvzf -Optional: Run script on every boot
Yes. You also have to re-run the script after DSM downloads a newer version of the drive-compatibility database, which can happen between DSM updates.
It's best to schedule the script to run when the Synology boots.
- Go to Control Panel > Task Scheduler, click Create, and select Triggered Task.
- Select User-defined script.
- Enter a task name.
- Select root as the user.
- Select Boot-up as the event that triggers the task.
- Leave enable ticked.
- Click Task Settings.
- Optionally you can tick "Send run details by email" and "Send run details only when the script terminates abnormally" then enter your email address.
- In the box under "User-defined script" type the path to the script. e.g. If you saved the script to a shared folder on volume1 called "scripts" you'd type:
/volume1/scripts/Synology_HDD_db-main/syno_hdd_db.sh - Click OK to save the settings.
In your DSM see the changes
Sources (Script compatibility database)
Script to add your drives to your Synology's drive compatibility database v1.2.16
by u/DaveR007 in synology
007revadWhat the script does
- Gets the Synology NAS model and DSM version (so it knows which db files to edit).
- Gets a list of the HDD, SSD, SAS and NVMe drives installed in your Synology NAS.
- Gets each drive's model number and firmware version.
- Backs up the database files if there is no backup already.
- Checks if each drive is already in the Synology's compatible-drive database.
- Adds any missing drives to the Synology's compatible-drive database.
- Prevents DSM auto updating the drive database.
- Optionally disable DSM's "support_disk_compatibility".
- Optionally disable DSM's "support_memory_compatibility" to prevent non-Synology memory notifications.
- Optionally edits max supported memory to match the amount of memory installed, if installed memory is greater than the current max memory setting.
- DSM only uses the max memory setting when calculating the reserved RAM area size for SSD caches.
- Optionally disables Western Digital Device Analytics (aka WDDA) to prevent DSM showing a warning for WD drives that are 3 years old.
- DSM 7.2.1 already has WDDA disabled.
- Enables M2D20, M2D18, M2D17 and E10M20-T1 if present on Synology NAS that don't officially support them.
- Checks that M.2 volume support is enabled (on models that have M.2 slots or PCIe slots).
- Enables creating M.2 storage pools and volumes from within Storage Manager (newer models only?).
- Including M.2 drives in PCIe adaptor cards like M2D20, M2D18, M2D17 and E10M20-T1 for DSM 7.2.1 and above (need to run script after each boot).
- Makes DSM recheck disk compatibility so rebooting is not needed if you don't have M.2 drives (DSM 7 only).
- If you have M.2 drives you may need to reboot.
- Reminds you that you may need to reboot the Synology after running the script.
- Checks if there is a newer version of this script and offers to download it for you.
- The new version available messages time out so they don't prevent the script running if it is scheduled to run unattended.
Create Partition
Login as root sudo -s with SSH and type :
ls /dev/nvme*In this case /dev/nvme0n1You will see the /dev/nvme0n1 or /dev/nvme1n1 depend on which slot you install the SSD.
If your SSD at slot 2, use /dev/nvme1n1 insteadfdisk -l /dev/nvme0n1
Disk /dev/nvme0n1: 931.5 GiB, 1000204886016 bytes, 1953525168 sectors
Disk model: Samsung SSD 980 PRO 1TB
Units: sectors of 1 * 512 = 512 bytes
Sector size (logical/physical): 512 bytes / 512 bytes
I/O size (minimum/optimal): 512 bytes / 512 bytes
With this command we check
synopartition --check /dev/sata1/dev/sata1: partition layout is version 8, list index is 14.We use 14 for the next command.
synopartition --part /dev/nvme0n1 14--part [--force] disk_path index_of_list(1~20) [logical_size_GB ... 0]
Partition the disk with specific layout. Device Sectors (Version6: SupportRaid)
/dev/nvme0n11 4980087 (2431 MB)
/dev/nvme0n12 4192965 (2047 MB)
Reserved size: 257040 ( 125 MB)
Primary data partition will be created.
WARNING: This action will erase all data on '/dev/nvme0n1' and repart it, are you sure to continue? [y/N]and answer y if you confirm
WARNING! You have only one disk.
Cleaning all partitions...
Creating sys partitions...
Creating primary data partition...
Please remember to mdadm and mkfs new partitions.
it will create the partition that follow DSM required layout.
Type
fdisk -l /dev/nvme0n1
You will see the partition layout is created
Disk /dev/nvme0n1: 931.5 GiB, 1000204886016 bytes, 1953525168 sectors
Disk model: Samsung SSD 980 PRO 1TB
Units: sectors of 1 * 512 = 512 bytes
Sector size (logical/physical): 512 bytes / 512 bytes
I/O size (minimum/optimal): 512 bytes / 512 bytes
Disklabel type: dos
Disk identifier: 0x75e5d2a8

Device         Boot   Start        End    Sectors  Size Id Type
/dev/nvme0n1p1         2048    4982527    4980480  2.4G fd Linux raid autodetect
/dev/nvme0n1p2      4982528    9176831    4194304    2G fd Linux raid autodetect
/dev/nvme0n1p3 9437184 1953520064 1944082881 927G fd Linux raid autodetect/dev/nvme0n1p3Create FileSystem
Format Partition
Formatting as Ext4 or BTRFS
Option: BRTFS
mkfs.btrfs -f /dev/nvme0n1p3Option: Ext4
mkfs.ext4 -F /dev/nvme0n1p3mke2fs 1.44.1 (24-Mar-2018)
Creating filesystem with 243010096 4k blocks and 60760064 inodes
Filesystem UUID: 12aee3b8-c62b-46c4-88f7-a412d8010017
Superblock backups stored on blocks:
32768, 98304, 163840, 229376, 294912, 819200, 884736, 1605632, 2654208,
4096000, 7962624, 11239424, 20480000, 23887872, 71663616, 78675968,
102400000, 214990848
Allocating group tables: done
Writing inode tables: done
Creating journal (262144 blocks): done
Writing superblocks and filesystem accounting information: done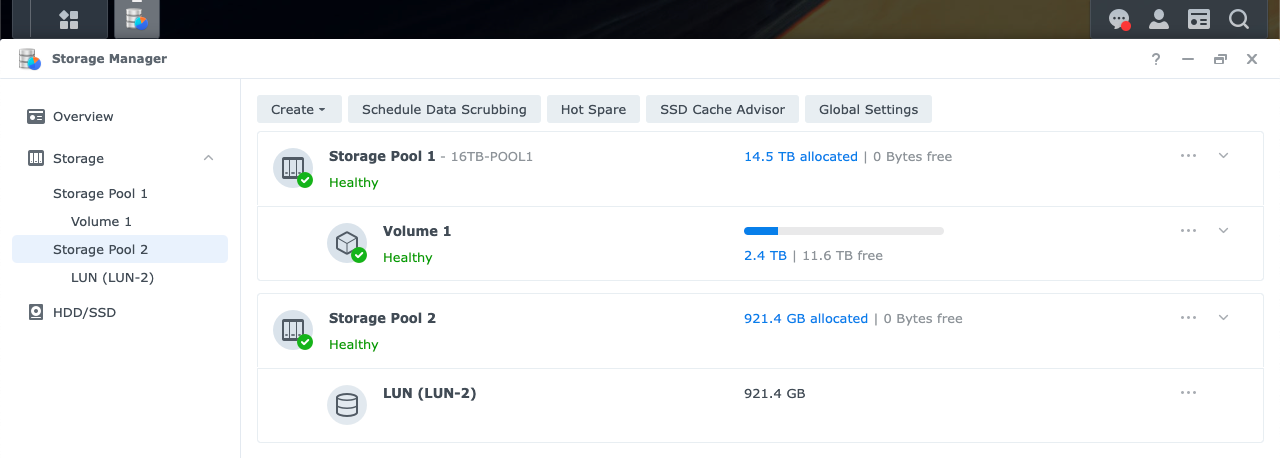
Attach new partition to new RAID array
We need to see how many Multiple Devices (md) are, and attach the NVMe partition to new one.
Type:
cat /proc/mdstat
md. For example md3Personalities : [raid1]
md2 : active raid1 sata1p5[0]
15621042624 blocks super 1.2 [1/1] [U]
md1 : active raid1 sata1p2[0]
2097088 blocks [4/1] [U___]
md0 : active raid1 sata1p1[0]
2490176 blocks [4/1] [U___]
unused devices: <none>md2, the next index would be md3. Remember for later: md3mdadm --create /dev/md3 --level=1 --raid-devices=1 --force /dev/nvme0n1p3/dev/nvme0n1p3 to new RAID array md3Continue creating array? Answer: y and press Enter
mdadm: Note: this array has metadata at the start and
    may not be suitable as a boot device.  If you plan to
    store '/boot' on this device please ensure that
    your boot-loader understands md/v1.x metadata, or use
    --metadata=0.90
Continue creating array? y
mdadm: Defaulting to version 1.2 metadata
mdadm: array /dev/md3 started.
Continue creating array? Press y and ENTERReboot
rebootOnline Assemble on DSM
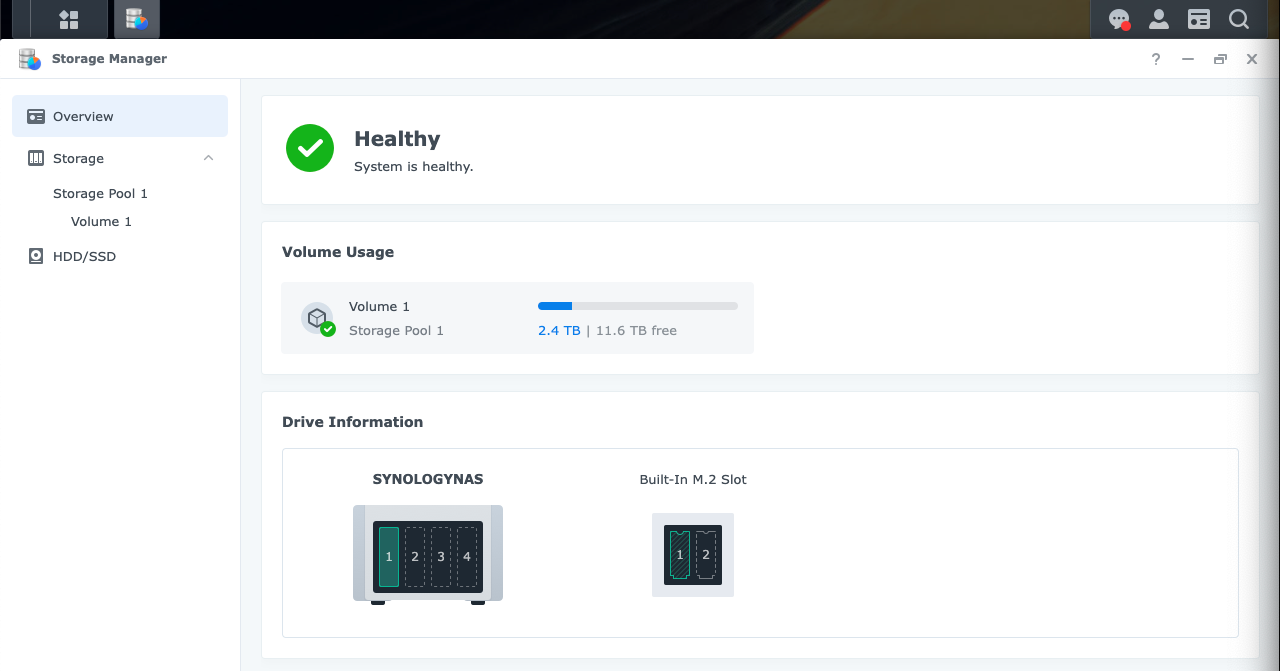
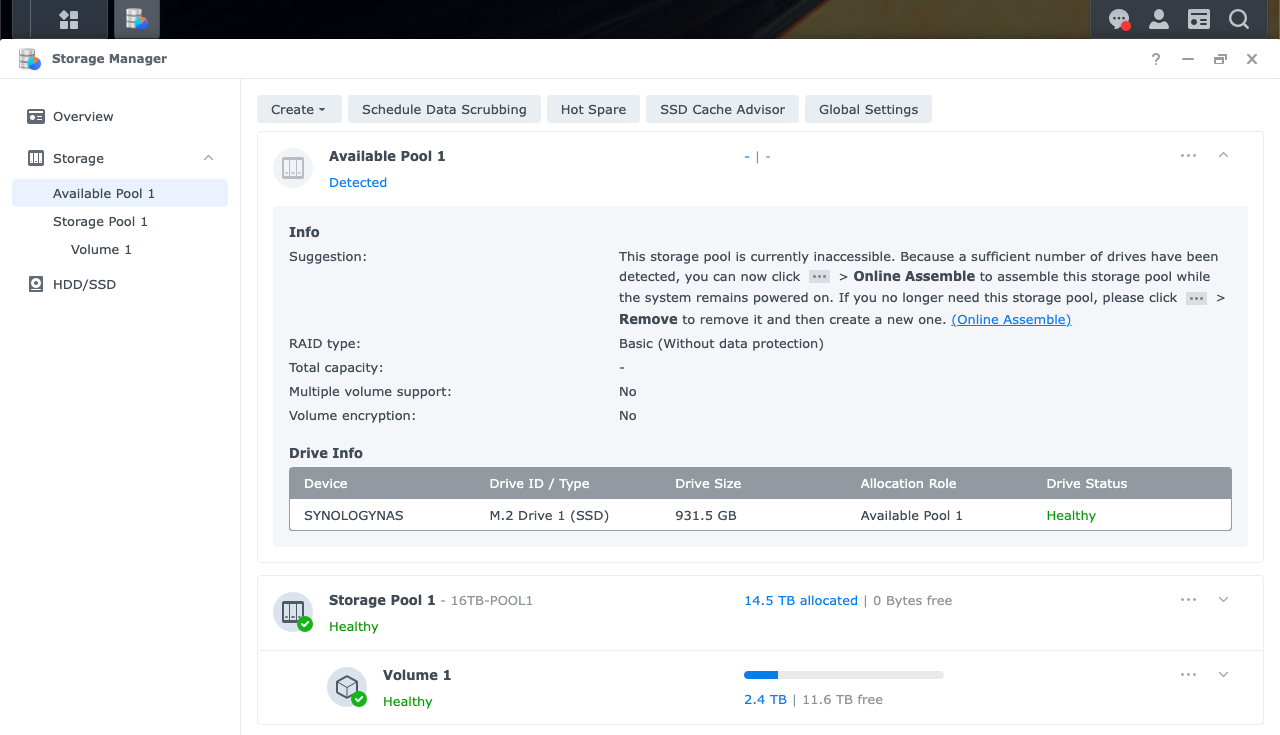
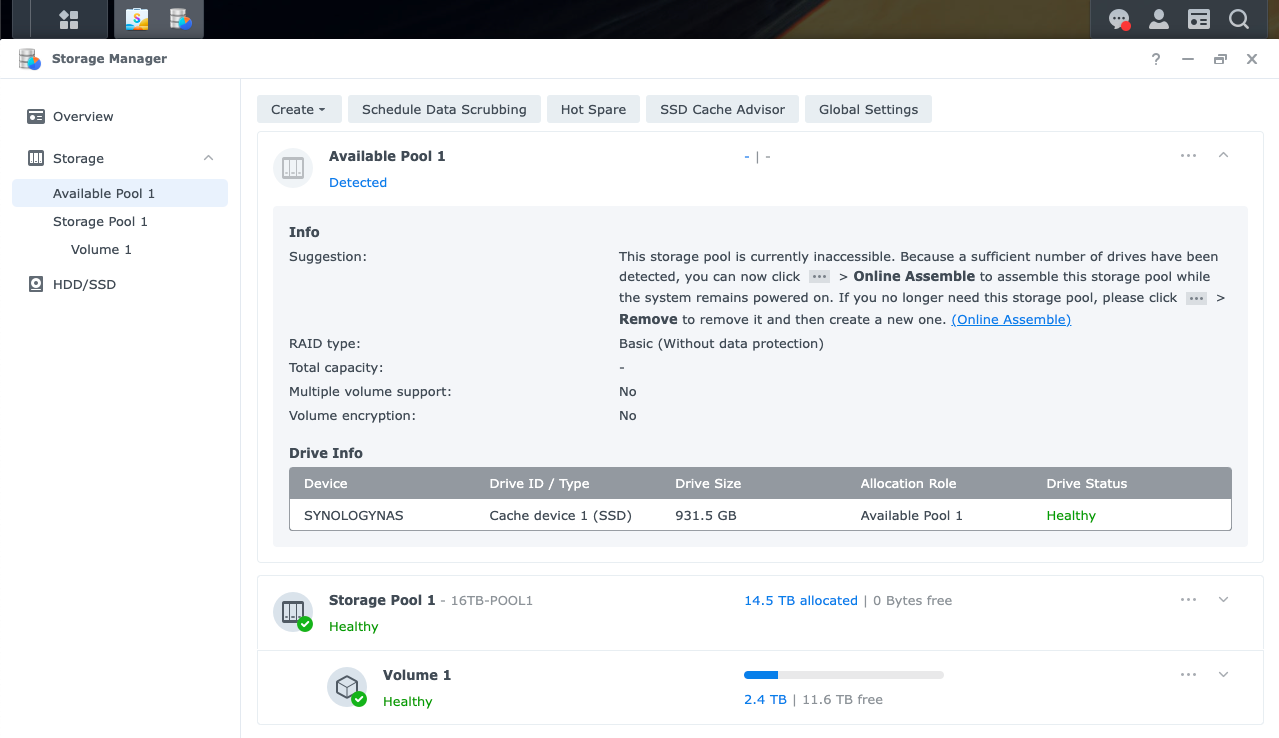
And after the machine bootup, you will see in the Storage Manager, Storage Available Pool 1
- Go to: Available Pool 1
- Look for the three-dots (...) More-icon and hit: Online Assemble
- Hit: Apply
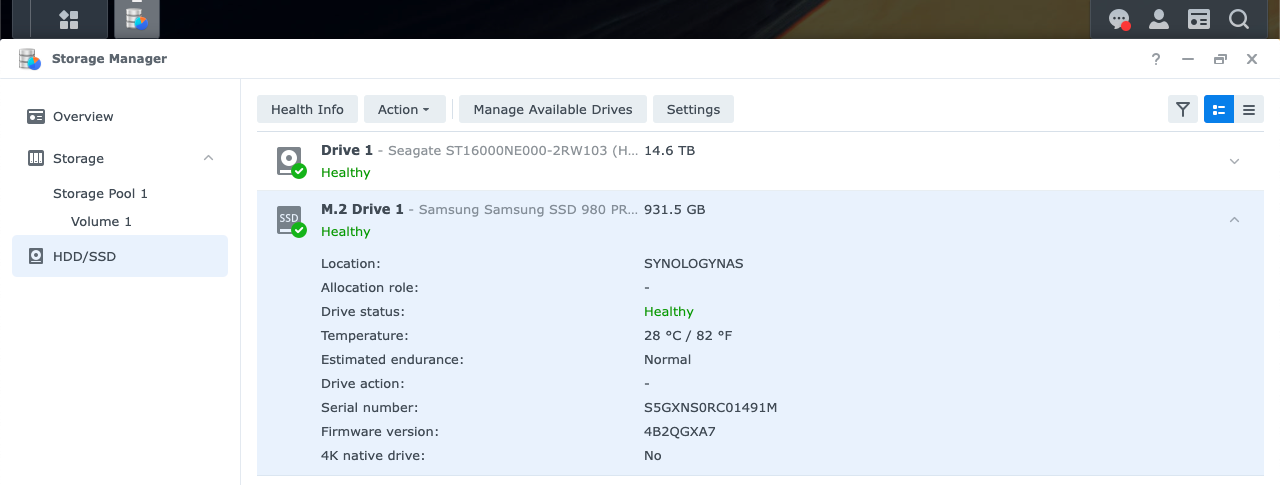
View (M.2 Drive)


Alternative view (M.2 Cache)
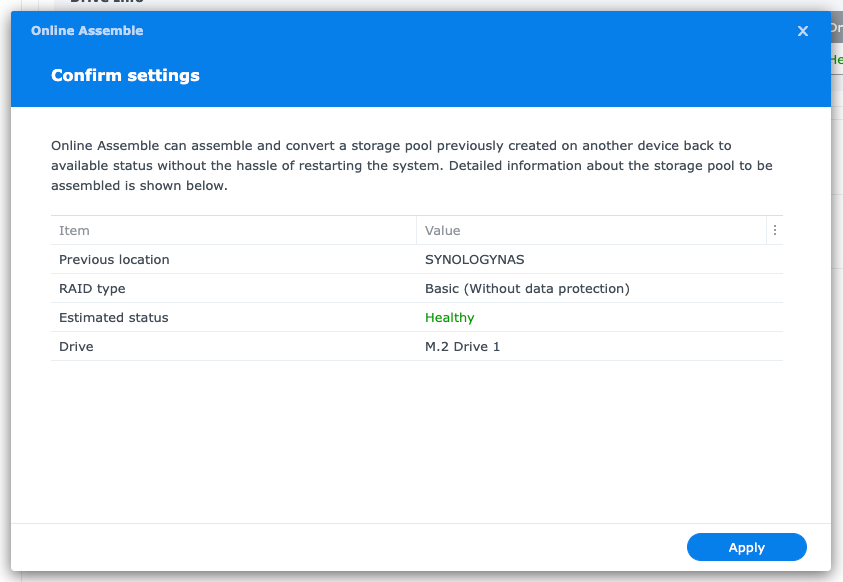
Then hit the More-icon (the three dots ...) for Online Assemble
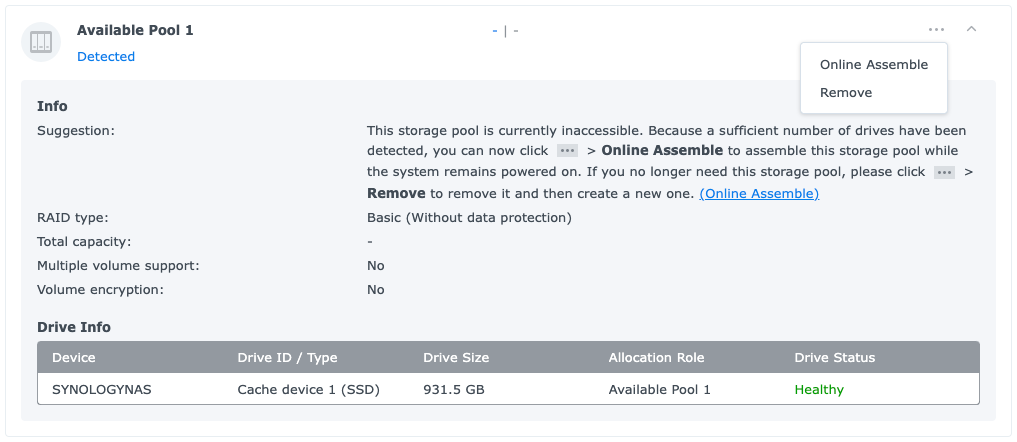
Confirm settings, hit Apply
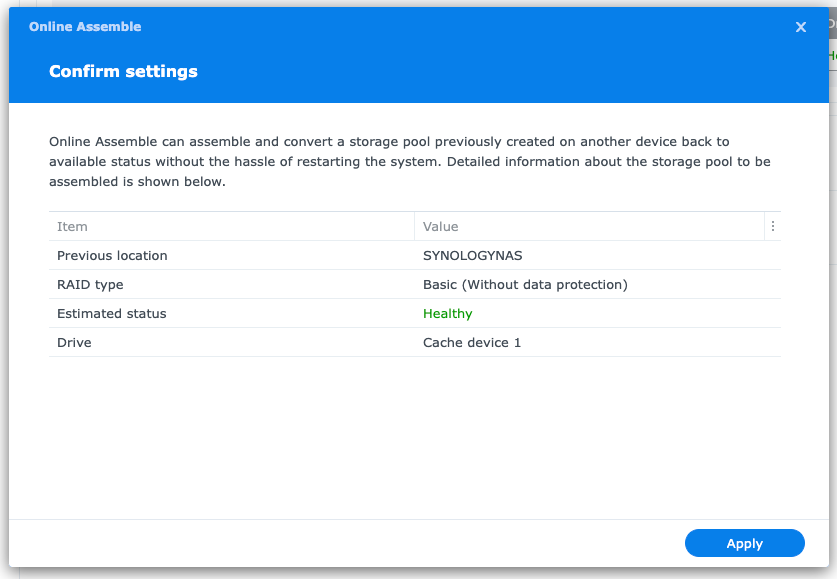

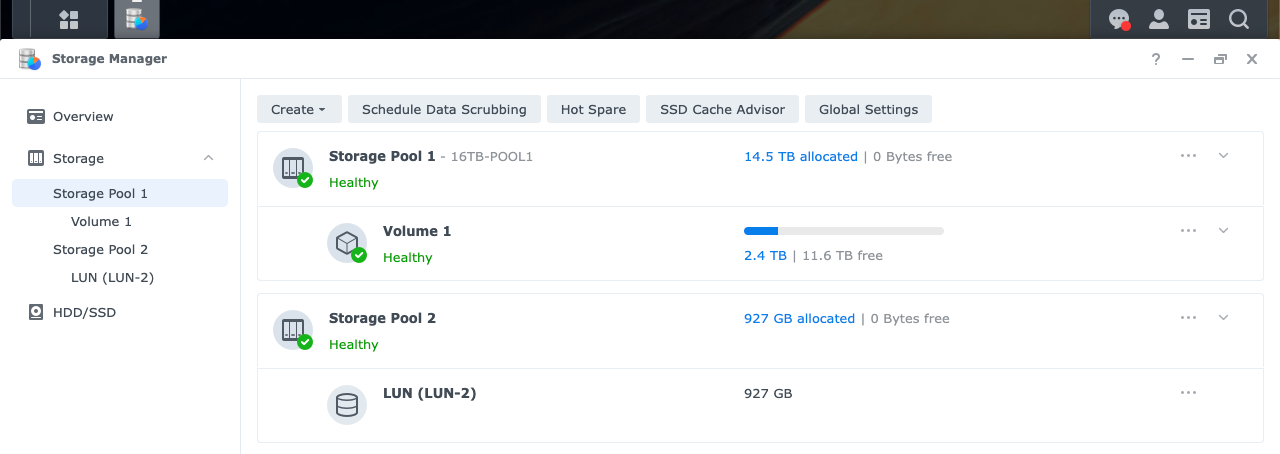
Result
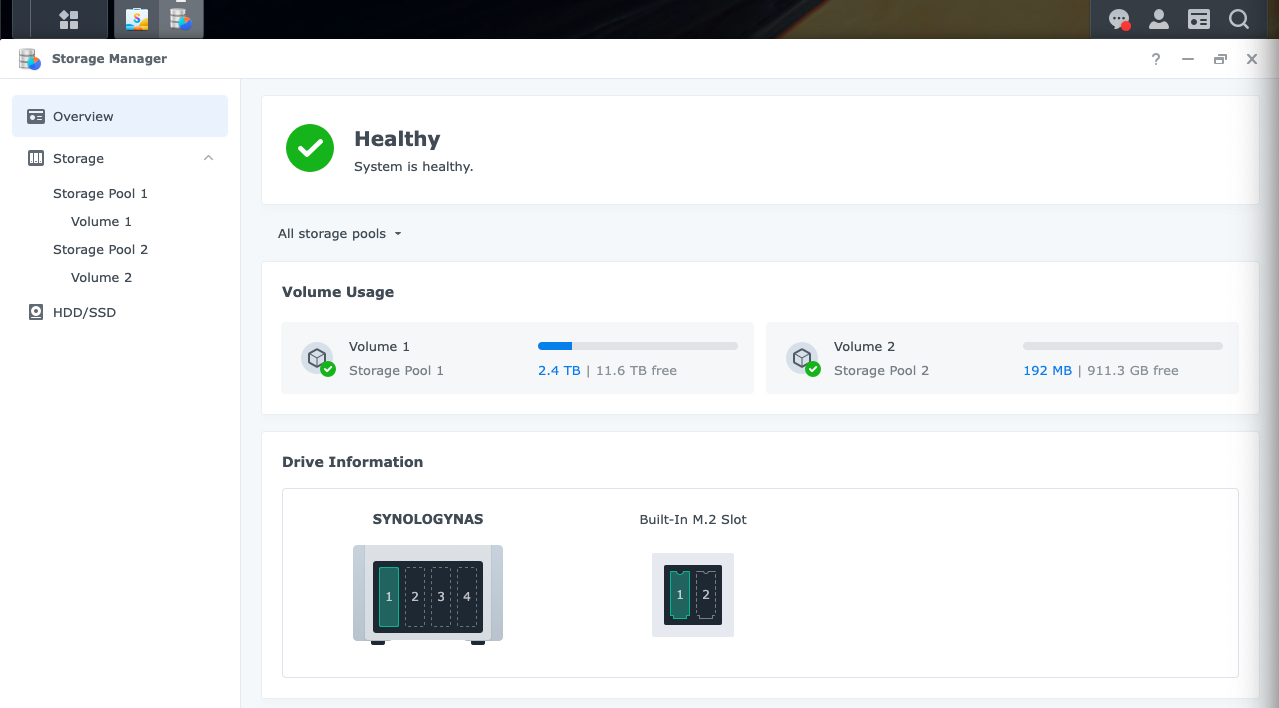
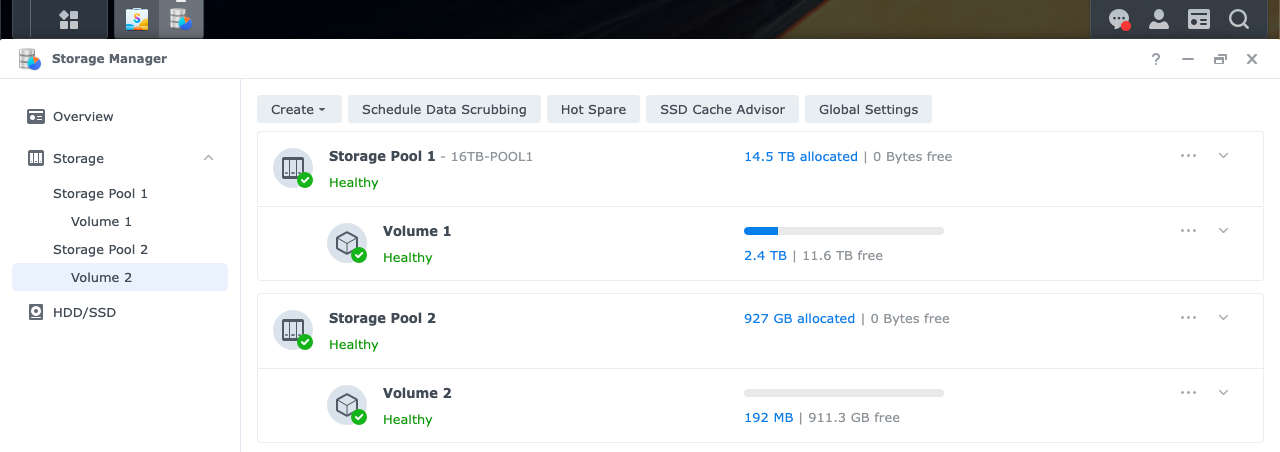
As a result Storage Pool 2 is ready and healthy
View (M.2 Drive)
-- insert images --
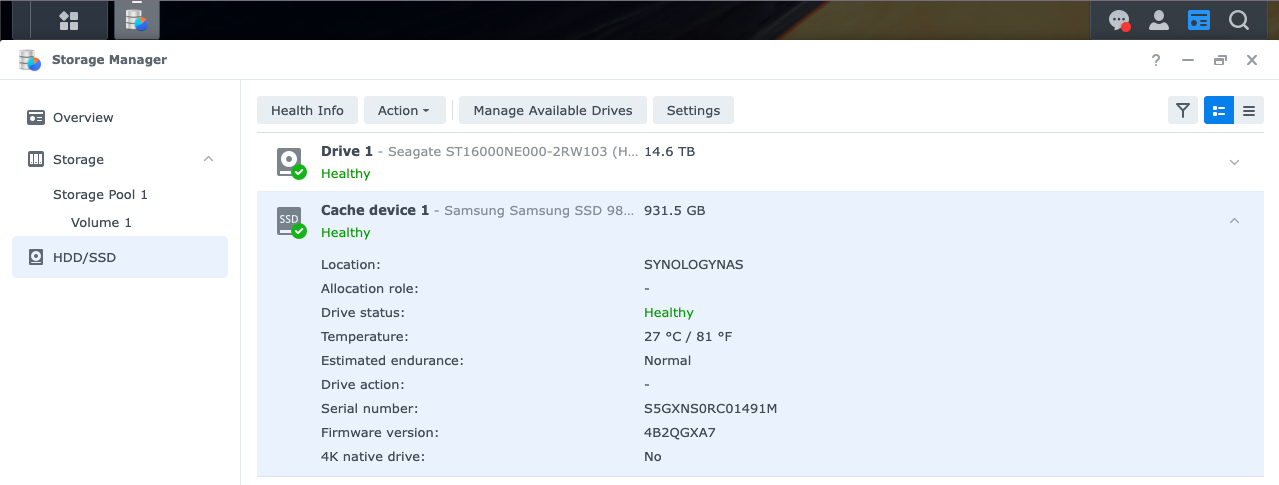
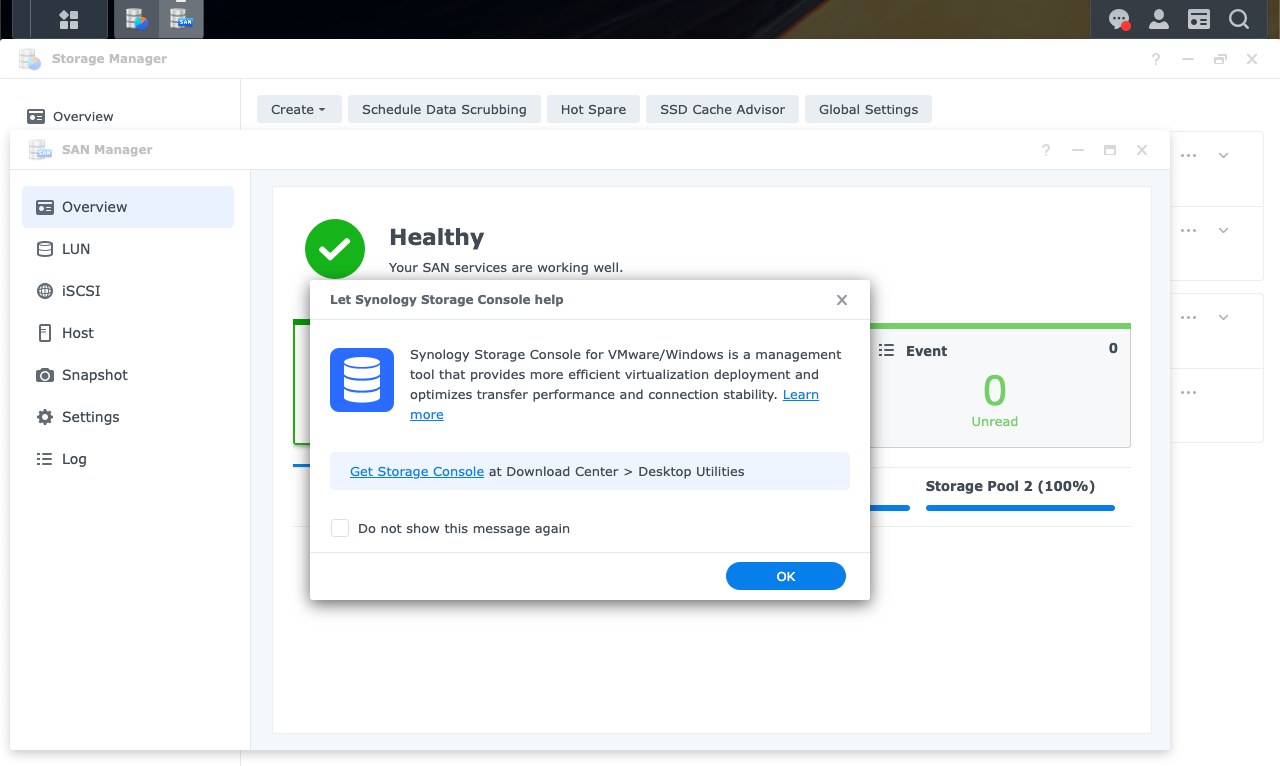
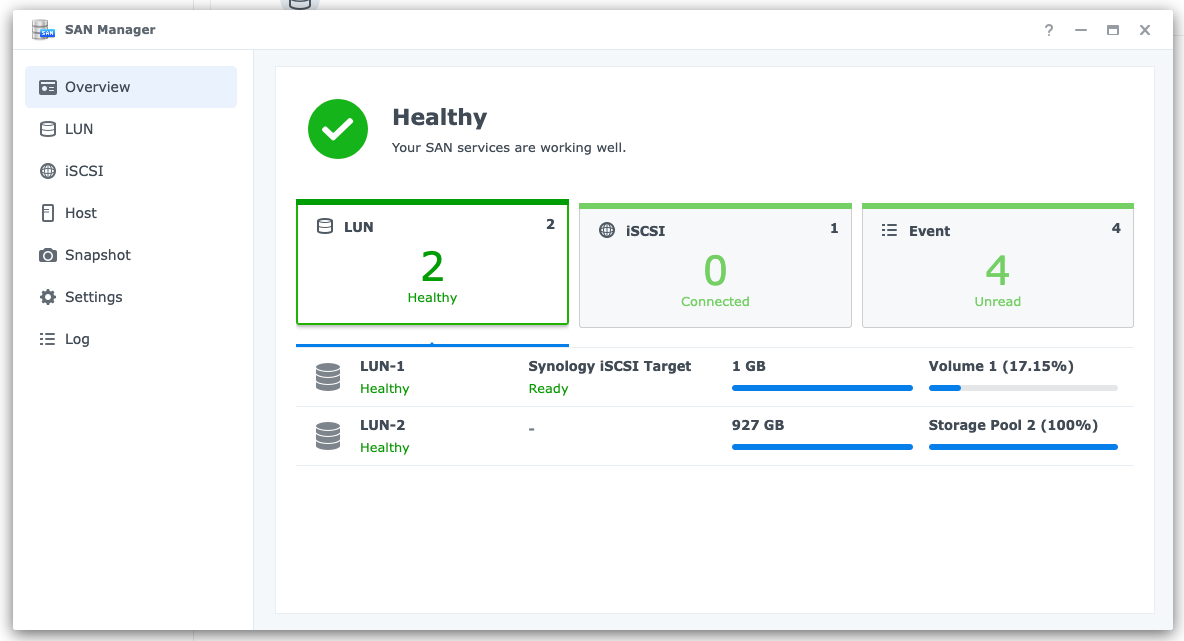
Alternative View (M.2 Cache)
History
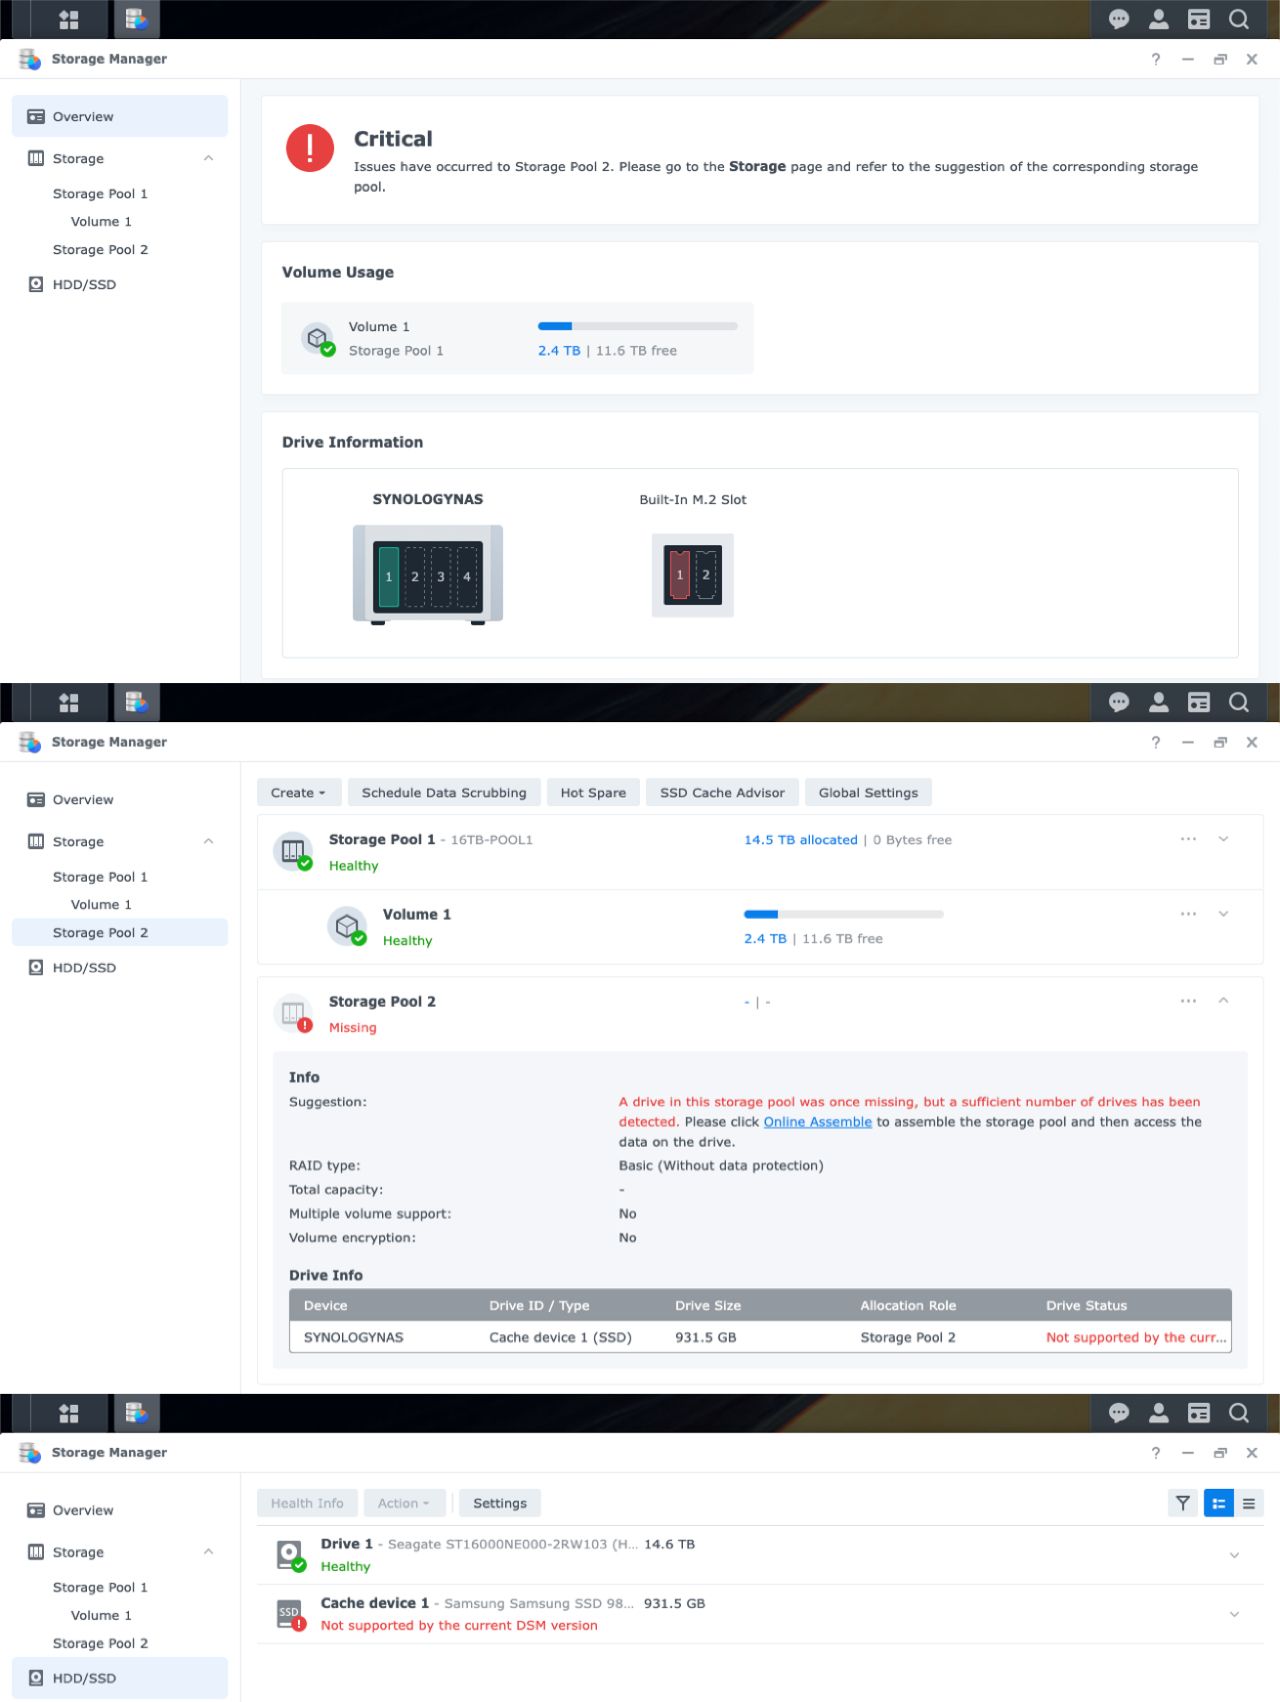
My Storage Pool 2 stops working after reboot. Volume 2 didn’t show. Very frustrating, until I found the script that updates device database. See below the screenshots what it look like when it fails.
Incompatible NVMe
Everything seems fine, until you reboot your DSM (or have a power outage)
Specs
My NVMe specifications:
- Samsung PCIe 4.0 NVMe SSD 980 PRO 1 TB
Revive your critical device
You can go back and remove the Storage Pool (Critical Device).
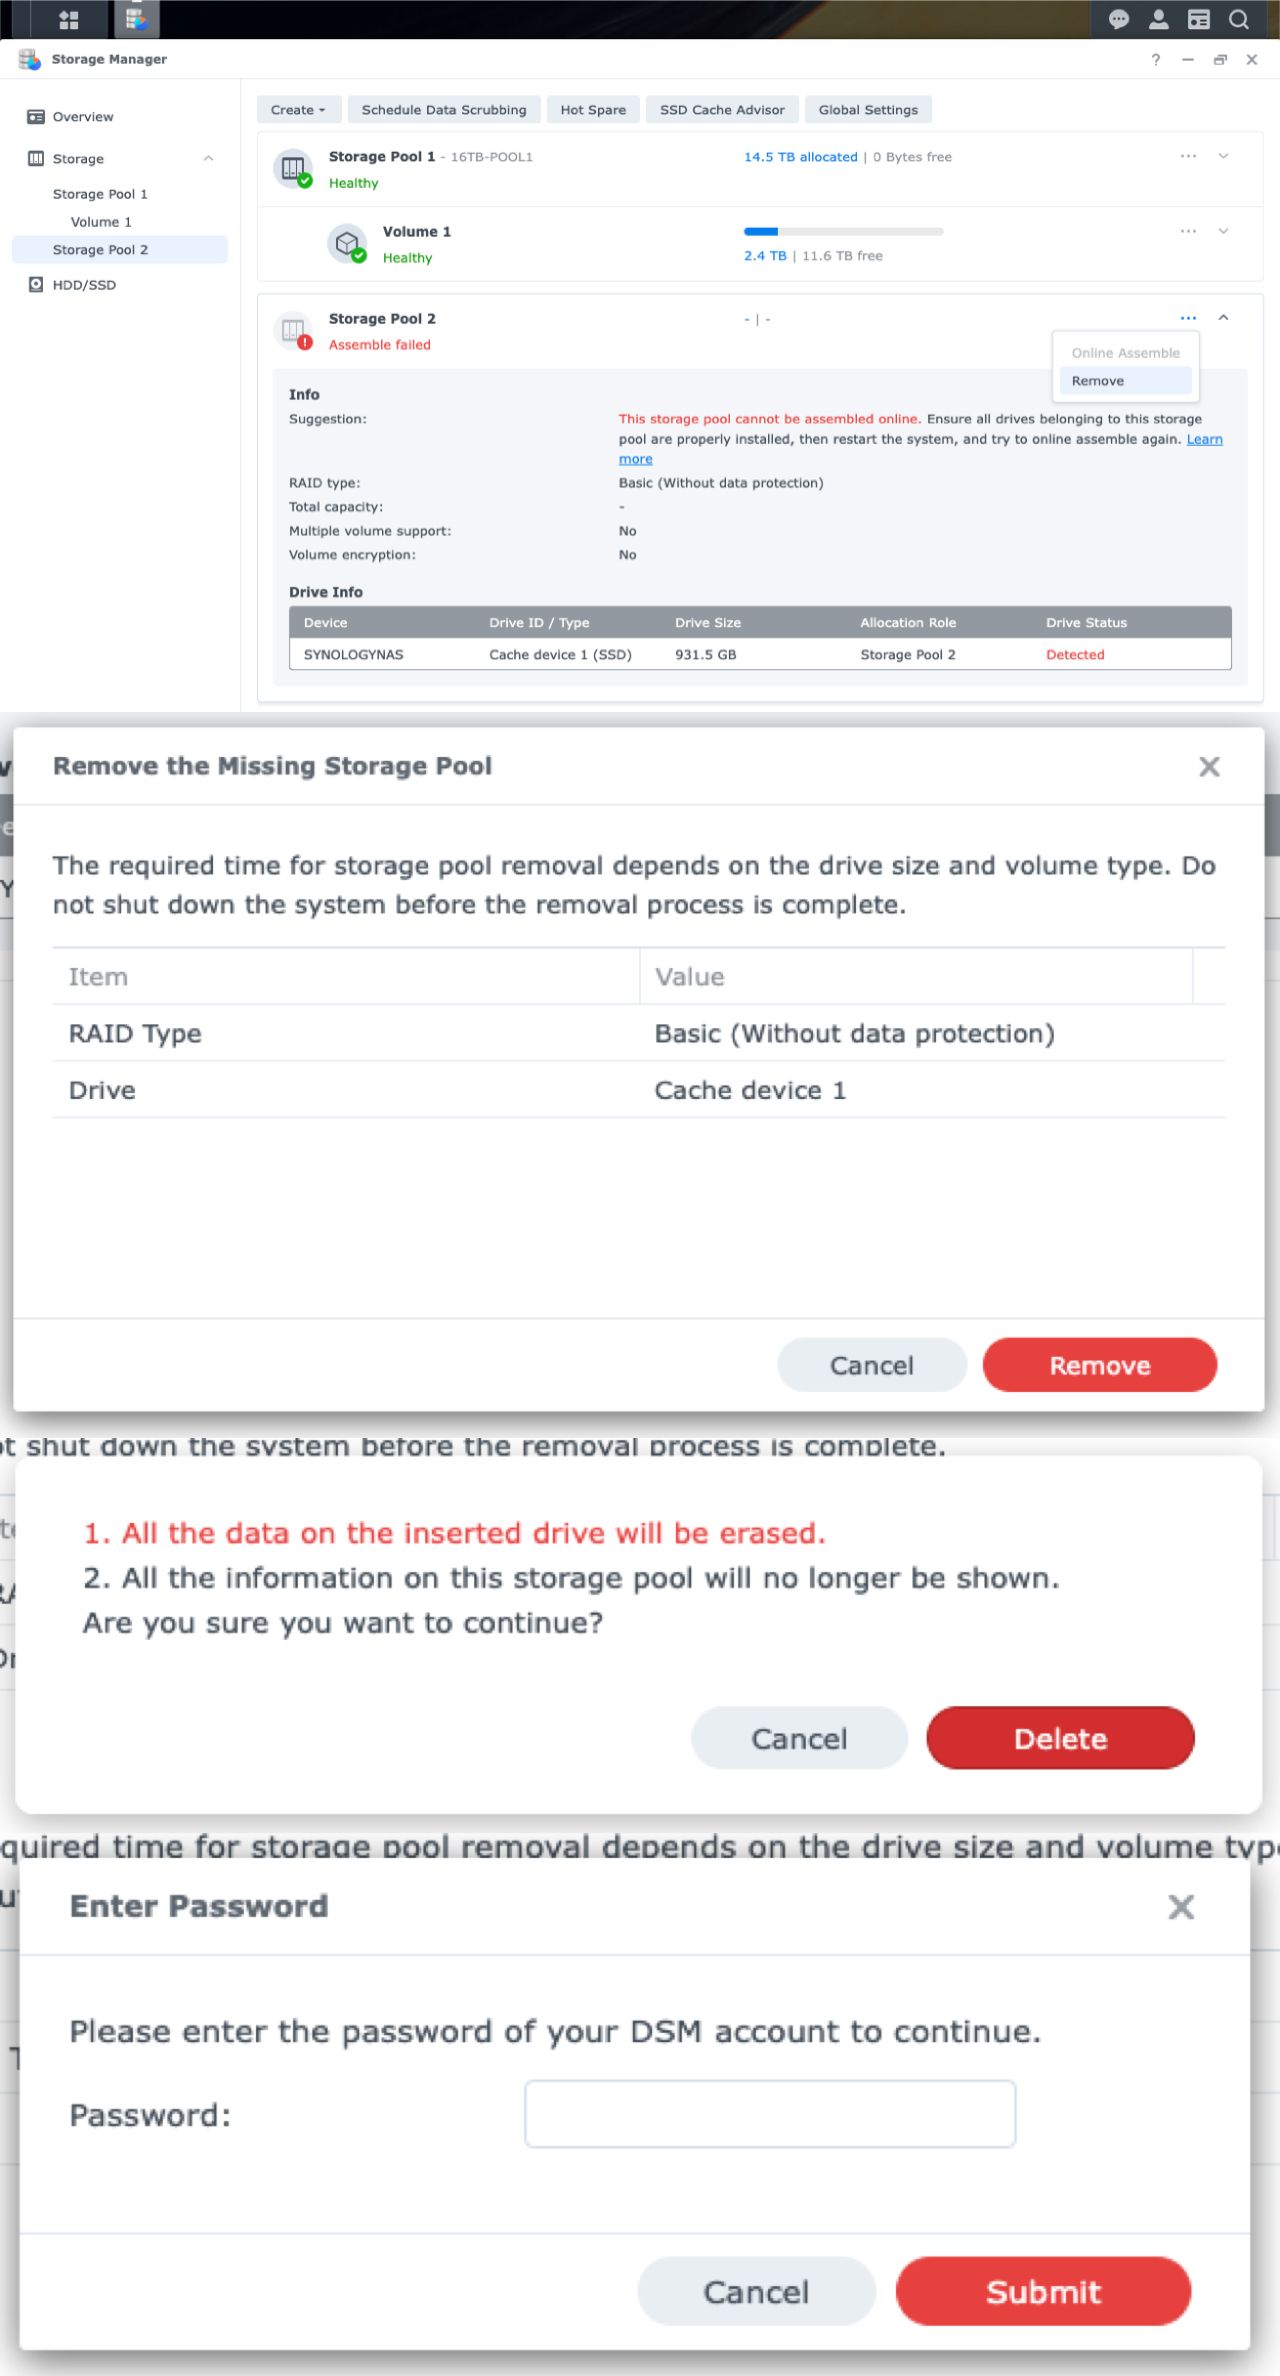
Assuming DSM creates a record for the Storage Pool, that’s still active and for some reason unable to find a device.
The device/dev/md3seems to be gone after Online Assemble and the reboot.
Go back to your terminal and format your NVMe. Remember your last address you messed around: /dev/nvme0n1
Login as rootsudo -s with SSH and type:
synopartition --part /dev/nvme0n1 14mkfs.btrfs -F /dev/nvme0n1p3rebootFix
Use the script
Trouble Shoot
I removed Storage Pool 2 by accident
You’ve lost all your data. Start over again with re-partition your NVMe again.
I rebooted my Synology
When you followed my article and missed the ‘Update my Synology HDD Database’ part. Use the script.